Nestjs
Nestjs is a server-side application framework
- highly opinionated
- supports multiple data paradigms, such as ClientServer, pub/sub etc.
- achieves SOLID principles by the use of modules.
- module dependency is achieved with constructor dependency injection.
- Modules import providers to perform some purpose (such as retrieve data from a database, send a message etc.), and those providers are made available within the module. To pass
- Nestjs provides an all-tools-supplied approach.
- ex. It has modules out of the box for connections to most types of databases/datastreams (e.g. RDBs, Redis, Kafka, RabbitMQ) and
Platform
Nestjs is built on top of an HTTP Node framework
- default options are Express and Fastify
Depending on which underlying platform we use, we will get access to its API (NestExpressApplication or NestFastifyApplication)
- the resulting
appobject will have access to the methods of whichever underlying platform we choose.
const app = await NestFactory.create<NestExpressApplication>(AppModule);
in Nest, almost everything is shared across incoming requests.
- ex. We have a connection pool to the database, singleton services with global state, etc.
By default, modules are eagerly loaded (which means that as soon as the application loads, so do all the modules, whether or not they are immediately necessary).
- this is fine for the most part, but if we are running in a serverless environment, this would be problematic.
- in this case we want to lazy load the modules.
Lifecycle
A Nest application, as well as every application element, has a lifecycle managed by Nest.
- Nest provides lifecycle hooks that give visibility into key lifecycle events, and the ability to run registered code in your
module,injectableorcontrollerwhen they occur.
Lifecycle events can be broken into 3 phases: initializing, running and terminating
Dependency Injection and Decorators
Nest is built around the pattern of dependency injection, which is achieved through decorators.
- This is mostly done through the constructor (therefore, it's constructor-based dependency injection)
The general pattern is that we create a provider by decorating a class with @Injectable, then we pass that class into another c
- the
@Injectabledecorator enables the class to be registered and managed by the IoC container (@Modules)
When we inject a class into another class, Nest will instantiate the class and pass it to the controller's constructor.
Because of Typescript in Nestjs, it is very easy to manage dependencies, since they are resolved by type.
Context
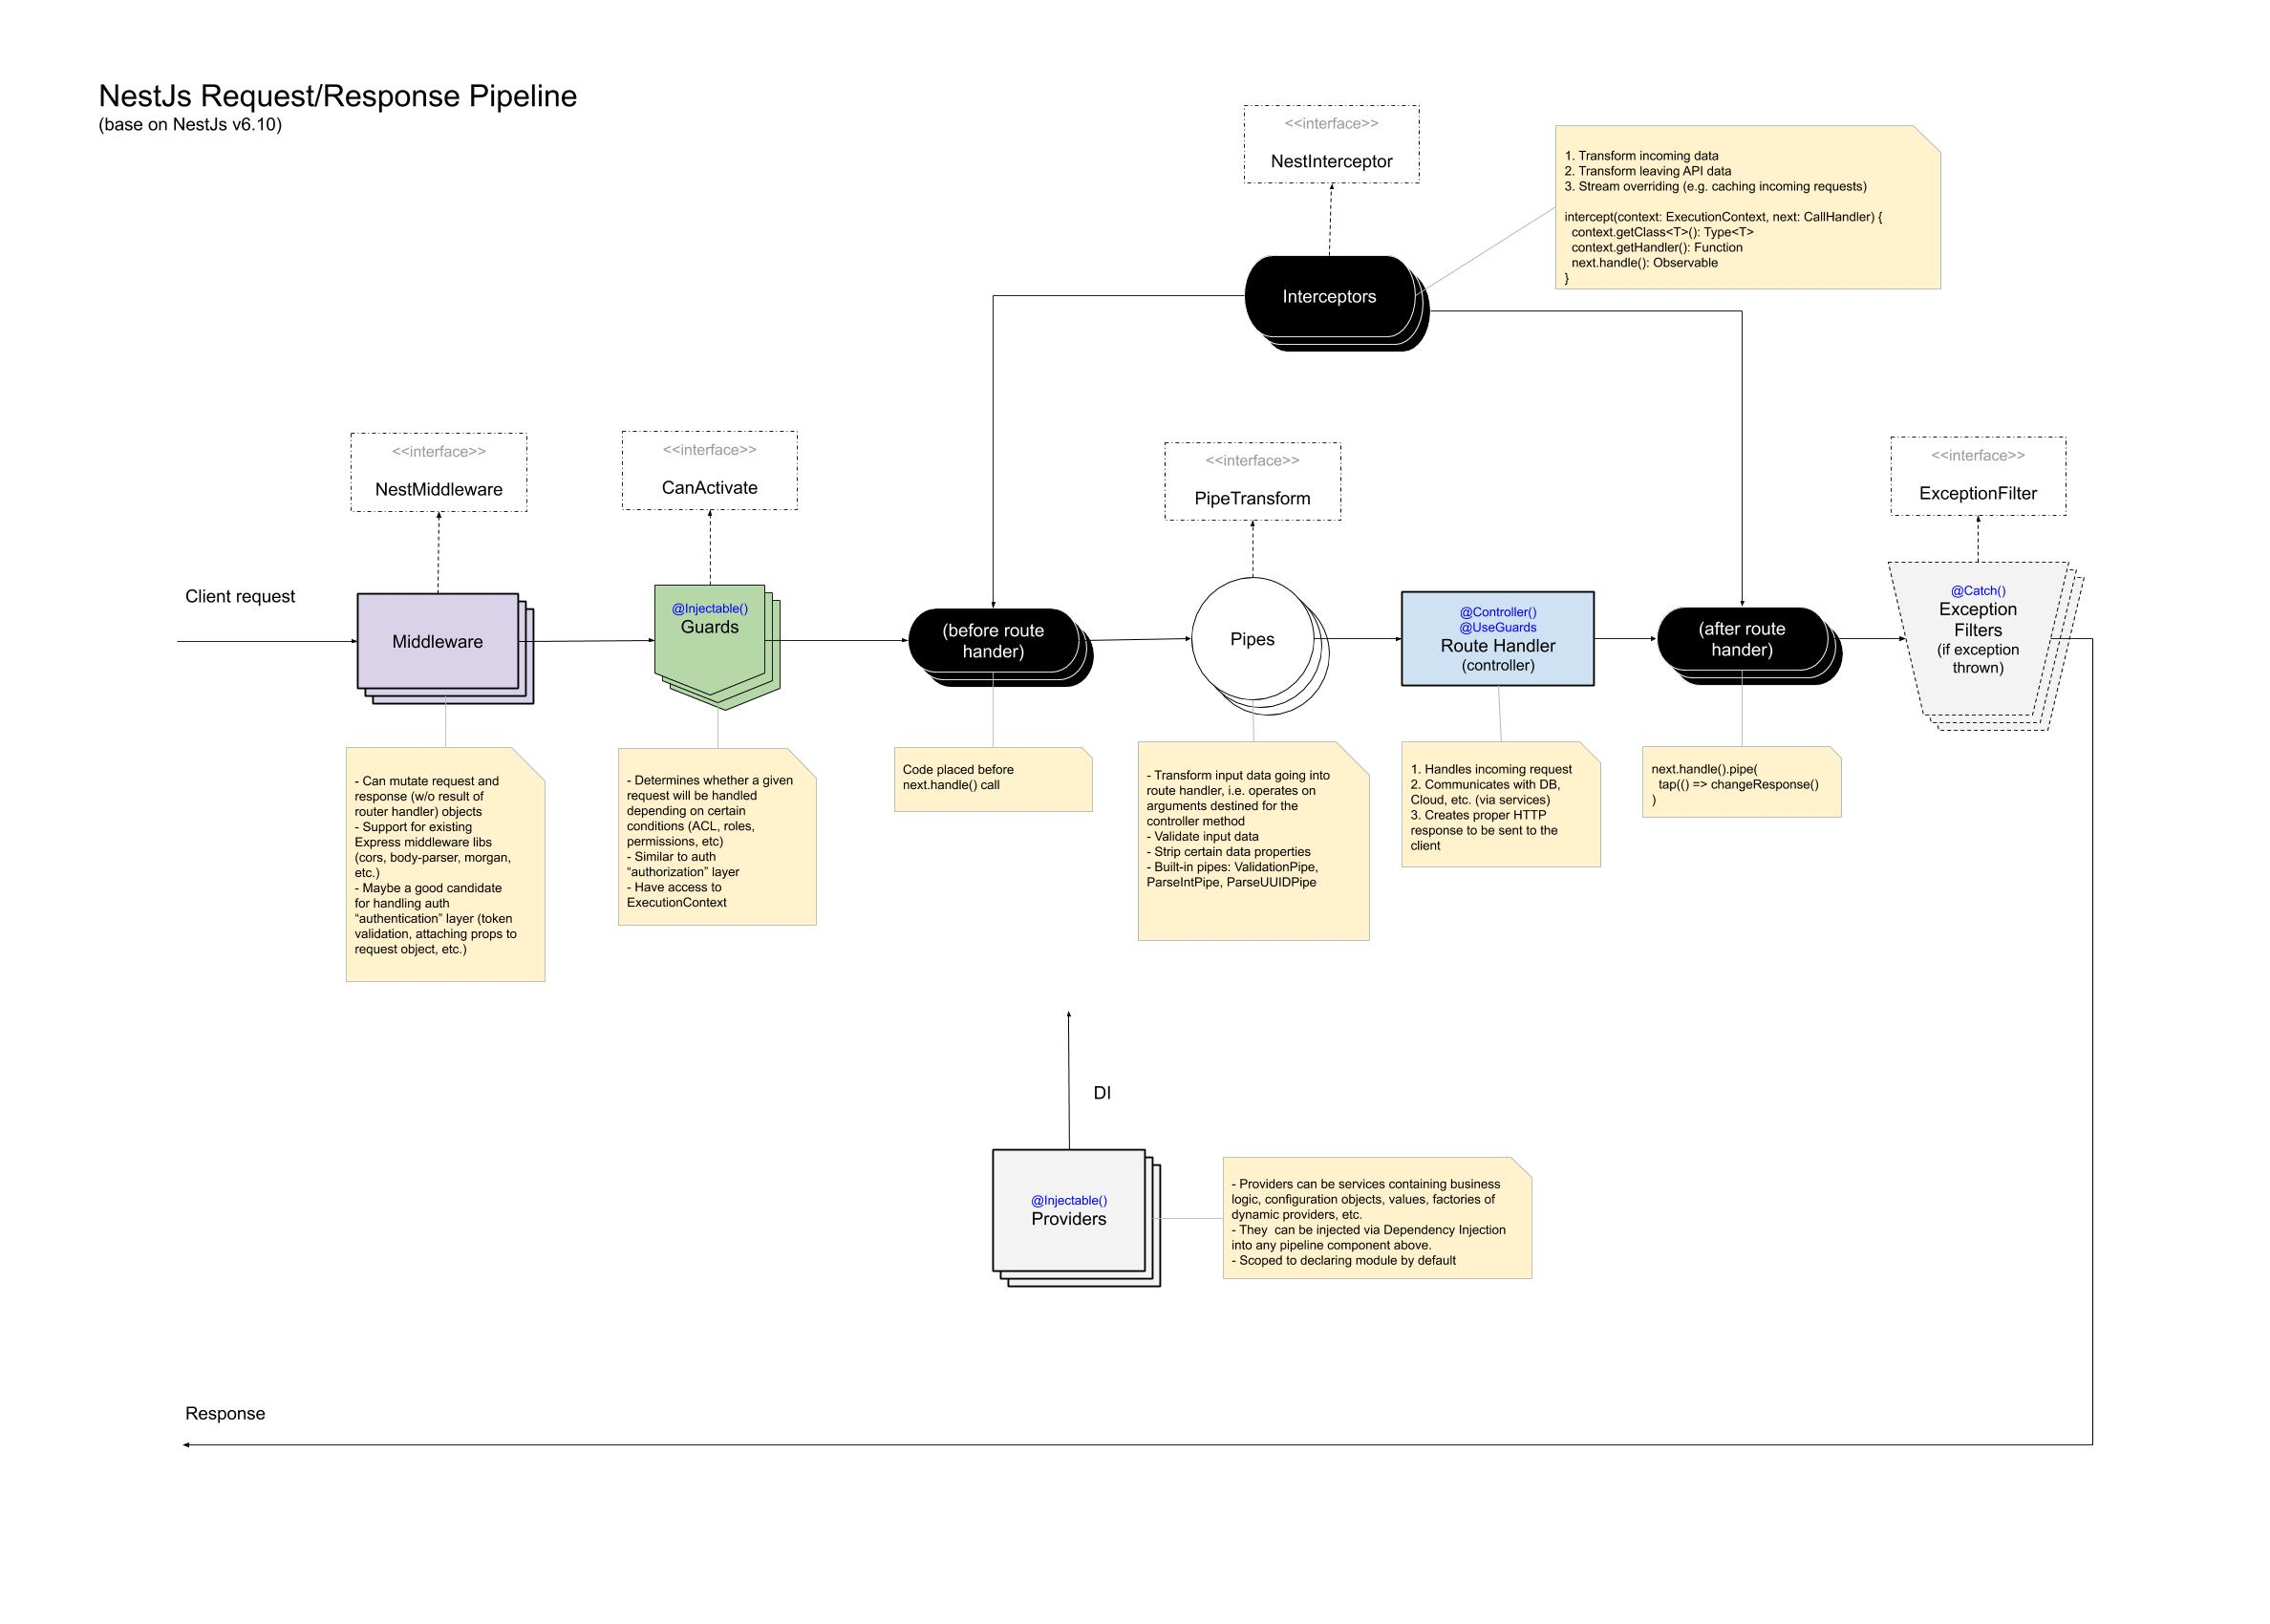
Guards, filters and interceptors are meant to be generic. That is, they don't care if they are being used in an HTTP context or WebSockets context.
- Nestjs provides utility classes that provide information about the current execution context.
- this information can be used to build generic guards, filters, and interceptors that can work across a broad set of controllers, methods, and execution contexts.
- Two of these utility classes are
ArgumentsHostandExecutionContext.
ArgumentsHost
ArgumentsHost is simply an abstraction over a handler's arguments.
- ex. for HTTP server applications, the
hostobject encapsulates Express's[request, response, next]array - ex. for Graphql server applications, the
hostobject contains the[root, args, context, info]array.
This class provides methods for retrieving the arguments being passed to a handler. With it, we choose the appropriate context, and then we retrieve the arguments.
Methods
getType()tells us which context is being used (http,rpcetc.)getArgs()gets us back an array of arguments being passed to the handler- this is generic, since we don't know what arguments we are getting back (since the context has not been specified). For this reason, using
switchTo...methods might be preferable, since they return more specific types (such asHttpArgumentsHostorRpcArgumentsHost)
- this is generic, since we don't know what arguments we are getting back (since the context has not been specified). For this reason, using
switchToHttp()
const ctx = host.switchToHttp();
const request = ctx.getRequest<Request>();
ExecutionContext
ExecutionContext extends ArgumentsHost, and gives us additional details about the current execution process.
Nest provides an instance of ExecutionContext in places you may need it, such as in the canActivate() method of a guard and the intercept() method of an interceptor.
Methods
getClass()Returns the type of the controller class which the current handler belongs to.getHandler()Returns a reference to the handler (method) that will be invoked next in the request pipeline.- ex. in an HTTP context, if the currently processed request is a POST request, bound to the
create()method on theCatsController,getHandler()returns a reference to thecreate()method andgetClass()returns theCatsControllertype (not instance).
- ex. in an HTTP context, if the currently processed request is a POST request, bound to the
The ability to access these references gives us the opportunity to access the metadata set through the @SetMetadata() decorator from within guards or interceptors.
Metadata and Reflection
We can attach custom metadata to route handlers with the @SetMetadata() decorator, which can then be accessed from within the class via dependency injection (with the Reflector helper class) to make certain decisions.
- ex. we can create some metadata about the roles that a user has.
Core Components
Modules
Modules are the way to organize your components in Nest.
- Decorating a class with
@Moduleprovides metadata that Nest makes use of to organize the application structure.
Each application has at least one module, a root module.
- this is the starting point Nest uses to build the application graph, which is the internal data structure used to resolve module and provider relationships and dependencies.
- this is the module that we register in our
main.tswithNestFactory.create(AppModule)
For most applications, the resulting architecture will employ multiple modules, each encapsulating a closely related set of capabilities.
- good practice is to have each module correspond to a domain
The module encapsulates providers by default
- This means that in order to inject providers into a different module, they must be exported from the imported module.
modules are singletons by default
- thus you can share the same instance of any provider between multiple modules effortlessly.
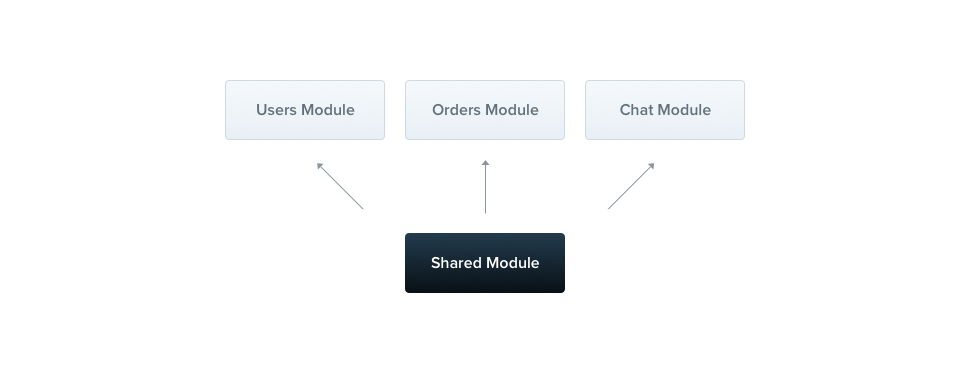
- Every module is automatically a shared module: Once created it can be reused by any module
- to do this, simply add the service to the
exportsarray of the shared module. Now, any module that imports the shared module will have access to the service listed in thatexportsarray.
- to do this, simply add the service to the
@Module({
  // correspond to the HttpService class that gets injected into the provider (service).
  imports: [HttpModule],
  providers: [AutomationService],
  exports: [AutomationService],
})
export class AutomationModule {
  // Modules can inject providers (e.g. for configuration purposes):
  constructor(private automationService: AutomationService) {}
}
Modules themselves cannot be injected due to circular dependency.
Parts of a module
The @Module() decorator takes a single object whose properties describe the module:
providerscontrollersimportsexports
providers
The providers property is an array of providers that will be instantiated by the Nest injector and that may be shared at least across this module.
- When we put a provider here, we are registering it with the IoC container (ie. the NestJS runtime) so that it can be instantiated at the site where it is injected (this is dependency injection).
controllers
the set of controllers defined in this module which have to be instantiated
imports
the list of imported modules that export the providers which are required in this module
- put another way, if there is a provider from another module and we want to use it in our module, then we must add the provider to that module's
exportslist, and then include that module in ourimportslist.
this array enables sharing of providers across modules
Don't add the same provider to multiple modules. Instead, export the provider, and import the module.
exports
the subset of providers that are provided by this module and should be available in other modules which import this module. You can use either the provider itself or just its token (provide value)
you may consider the exported providers as the module's API
Modules can export their internal providers
- In addition, they can re-export modules that they import.
Dynamic Modules
Dynamic modules enable us to easily create customizable modules that can register and configure providers dynamically.
Dynamic modules are created in the module class:
import { createDatabaseProviders } from './database.providers';
import { Connection } from './connection.provider';

@Module({
  providers: [Connection],
})
export class DatabaseModule {
  // forRoot may be async or sync
  static forRoot(entities = [], options?): DynamicModule {
    const providers = createDatabaseProviders(options, entities);
    return {
      module: DatabaseModule,
      providers: providers,
      exports: providers,
    };
  }
}
Global Modules
Global modules are useful for when you want to provide a set of providers which should be available everywhere out-of-the-box (e.g., helpers, database connections, etc.)
We can make a set of providers global with the @Global decorator:
@Global()
@Module({
  // Module configuration
CLI
- generate a module named "cats" -
nest g module cats
Controllers
Controllers are responsible for handling incoming requests and returning responses to the client.
- Controllers should only handle HTTP requests; delegating more complex tasks to providers
Most often, providers are injected into controllers, allowing the controller the ability to call methods on the instantiated provider
- to do this, both the controller and the provider must be registered in the module
The routing mechanism controls which controller receives which requests.
Normally, each controller has more than one route, and different routes can perform different actions.
- in a REST api,
/customersand/productswould be 2 different controllers- ex. route path prefix implemented as
@Controller('customers')
- ex. route path prefix implemented as
The decorators (e.g. @Controller, @Get) associate classes with required metadata and enable Nest to create a routing map (which associates which requests belong with which controllers)
Route handlers can either return a Promise or an observable stream:
// Promise approach
@Get()
async findAll(): Promise<any[]> {
  return [];
}

// Observable approach
@Get()
findAll(): Observable<any[]> {
  return of([]);
}
If returning an observable stream, Nest will automatically subscribe to the source underneath and take the last emitted value (once the stream is completed)
Providers
What is it?
A provider is a class that can be injected into the constructor of other classes (dependency injection)
- We mark the class as a
providerby using the@Injectable()decorator, which lets us pass the class into a controller (spec: not limited to controllers), where it is then instantiated by the IoC container (ie. the NestJS runtime)
The main idea of a provider is that it can be injected as dependency; this means objects can create various relationships with each other, and the function of "wiring up" instances of objects can largely be delegated to the Nest runtime system.
A provider "provides" some value to the dependent that it is being used in.
- a service is a provider that, when injected into a class, allows the class to use the methods defined on the provider itself.
- ex. we could have a
NuggetsServiceprovider, whose role is to fetch nuggets. Now, from other providers we can inject theNuggetService, allowing us to fetch nuggets from that other provider.
- ex. we could have a
By default, a Provider belonging to a Module will be available within the module.
- in other words, it does not have to be imported in the
moduleif we are accessing the provider from within it.
Providers normally have a lifetime ("scope") synchronized with the application lifecycle.
- When the application is bootstrapped, every dependency must be resolved, and therefore every provider has to be instantiated.
- Similarly, when the application shuts down, each provider will be destroyed.
- there are ways to make your provider lifetime request-scoped as well.
Providers are plain JavaScript classes that are declared as providers in a module.
Responsible for things like:
- data storage and retrieval (Service)
- repositories, factories, helpers
Nest has a built-in IoC container that resolves relationships between providers.
The @Injectable() decorator attaches metadata, which declares that the class can be managed by the Nest IoC container
How does it work?
the syntax providers: [CatsService] is short-hand for the more complete syntax:
providers: [
  {
    provide: CatsService,
    useClass: CatsService,
  },
];
- with this syntax, we can clearly see that the
CatsServicetoken is being associated with the classCatsService- the shorthand exists since the most common use-case is that a token is used to request an instance of a class by the same name.
- the value for
provide(ie. the token) can also be a string or Symbol. In this case, it can only be injected with the@Injectdecorator, where the token is then referenced:@Inject('CONNECTION') connection: Connection
Registration process
Registration happens in the module file.
Registration is about associating a token (name/id) with a class.
// app.module.ts

// this is shorthand
providers: [CatsService],

// for this
providers: [
  {
    provide: CatsService, // token
    useClass: CatsService,
  },
];
Seeing the explicit construction helps to see how the registration process (into the Nestjs IoC container) is really just a mapping between the token and the class.
- This is done for convenience to simplify the most common use-case, where the token is used to request an instance of a class by the same name.
Injecting non-service based Providers
Though the most common use is to inject services, we can really inject any kind of value, allowing us to do things like put an external library into the Nest IoC container, or replace a real implementation with a mock object (useful for testing).
- ex. here, we are associating a string-valued token (
'CONNECTION') with a pre-existing connection object we've imported from an external file:
providers: [
  {
    provide: 'CONNECTION',
    useValue: connection,
  },
],
Which can be used in a provider:
@Injectable()
export class CatsRepository {
  constructor(@Inject('CONNECTION') connection: Connection) {}
}
Asynchronous providers (useFactory)
At times, the application start should be delayed until one or more asynchronous tasks are completed.
- ex. you may not want to start accepting requests until the connection with the database has been established.
This can be accomplished by registering a provider as an async function along with the useFactory syntax.
providers: [
  {
    provide: 'ASYNC_CONNECTION',
    useFactory: async () => {
      const connection = await createConnection(options);
      return connection;
    },
  }
]
This factory function returns a provider, which can then be injected into a class like any other provider with @Inject('ASYNC_CONNECTION')
Here, Nest will await resolution of the useFactory promise before instantiating any class that depends on (injects) such a provider.
Custom Providers
Custom providers let us do things like:
- instantiate a provider by ourselves (instead of delegating that responsibility to the Nestjs runtime)
- re-use an existing class in a second dependency
- override a class with a mock version for testing
Class Provider (useClass)
useClass is the default way to specify which provider the token will resolve to.
- in other words, the shortform will resolve to this syntax.
We can dynamically determine the class that the token will resolve to by using a ternary operator in the useClass key.
- ex. imagine you have a default
ConfigService(therefore, high level of generality/abstraction). Depending on which environment we are in, we want to provide the Nestjs IoC container with a different implementation of the class.
Value Provider (useValue)
Specifying a provider like this is useful for injecting a constant value.
- ex. putting an external libary into the Nestjs container.
- ex. replace a real implementation with a mock object
The value to useValue will be a simple object that has the same interface as the service it is replacing.
Factory Provider
Middleware
Nestjs middleware is equivalent to Express middleware
Custom middleware is implemented either in either a function, or in a class with an @Injectable() decorator.
- The class should implement the
NestMiddlewareinterface, while the function does not have any special requirements.
Middleware fully supports dependency injection.
We set up middleware using the configure() method of the module class.
- Modules that include middleware have to implement the
NestModuleinterface.
@Module({
  imports: [CatsModule],
})
export class AppModule implements NestModule {
  configure(consumer: MiddlewareConsumer) {
    consumer
      .apply(LoggerMiddleware)
      .forRoutes('cats');
  }
}
Misc
- In Nest, a microservice is defined as an application that uses a different transport layer than HTTP.
Children
- CLI
- Controllers
- Guard
- Interceptor
- Microservices
- Middleware
- Modules
- Pipe
- Providers
- Runtim
- Testing in Nestjs
Backlinks